Building a Rogue AP with the Raspberry Pi Zero W
Please see the newer Rogue Portal project for more recent work.
May 9, 2020 - Updated for Raspbian Buster
I embarked upon a journey of configuration to get a Raspberry Pi Zero W to act as a WiFi hotspot and serve up a little Python web app to anyone who connected to it. In researching the topic, I came across this posting from Braindead Security: Building a Rogue Captive Portal for Raspberry Pi Zero W
It was almost exactly what I wanted, except for a few things:
- It was written for Raspbian Jessie Lite. I wanted to use a newer version of Raspbian.
- It set up the system for PHP. I wanted to use Python with Flask and WSGI.
- It used a hackish startup script in /etc/rc.local. I wanted to figure out how to set up all of the services properly through their respective configuration files instead of brute-forcing it. I also wanted to understand and document what each configuration step did.
So, I’ve borrowed heavily from Braindead’s tutorial, but I’ve updated it to achieve my goals. Unlike Braindead’s tutorial, this one will not comprehensively cover everything needed to get a functioning Rogue AP set up to steal login credentials. I focus more on the Raspian configuration required to create an access point and have it direct all traffic to a Python WSGI web app. I don’t bother to illustrate how to write an app that does anything interesting.
TL;DR
On a fresh install of Raspbian Buster Lite, run through the Preparation section below. Then clone https://github.com/jerryryle/rogue_ap and run setup.sh, then reboot. The Pi needs only a power supply, a wireless adapter on wlan0, and an internet connection.
Components
You will need the following:
- Raspberry Pi Zero W - though any Raspberry Pi model should work as long as it has a wireless adapter (built in or connected via USB)
- Micro SD card - Use at least a 4GB class 10 card
- HDMI cable and HDMI-compatible monitor or TV
- USB OTG cable and 2A AC adapter for power
- Keyboard and micro USB adapter or powered USB hub
- WiFi
- Computer with SD card reader to download Raspbian and install it onto the SD card
- Computer or phone with WiFi to test the Rogue AP
Preparation
First, you need to get the Raspberry Pi up and running with the required packages. Download the latest image of Raspbian Buster Lite from https://www.raspberrypi.org/downloads/raspbian/
Create a Raspbian SD Card
For writing the image to your SD card, get Etcher from https://www.balena.io/etcher/.
Insert the SD card in your computer and use Etcher to copy the Raspbian image to the SD card (it will overwrite any data currently on the card).

When Etcher has finished copying the image, remove the SD card from your computer, plug it into the Raspberry Pi, connect a keyboard and monitor, and plug in the AC adapter. The system should boot to a login prompt. Log in using the default username pi and password raspberry.
Set up a WiFi connection for internet access
In order to configure the device, you’ll need to configure the Raspberry Pi to connect to your WiFi network. You can either run sudo raspi-config and configure your network from the GUI or do it manually with the following steps.
Type this command to edit the wireless configuration:
sudo nano /etc/wpa_supplicant/wpa_supplicant.conf
To the end of the file, add the following lines, substituting the name of your local access point and its corresponding password:
network={
    ssid="WiFi Network"
    psk="password"
}
To save the file and exit, type Ctrl-X, then y, then Enter. Then, enter the following command to load the new network configuration:
sudo service networking restart
At this point, you might wish to enable ssh and perform as much of the the remaining configuration as possible over ssh. Setting this up is outside the scope of this document, but check out the “Interfacing Options” menu in the configuration tool invoked with sudo raspi-config.
Update Raspbian
Next, update the system with the following command:
sudo apt-get update && sudo apt-get dist-upgrade -y
Install additional dependencies
After the system has updated, install the additional required packages:
sudo apt-get install apache2 libapache2-mod-wsgi bridge-utils dnsmasq git hostapd iptables-persistent libapache2-mod-wsgi macchanger python-pip python-flask
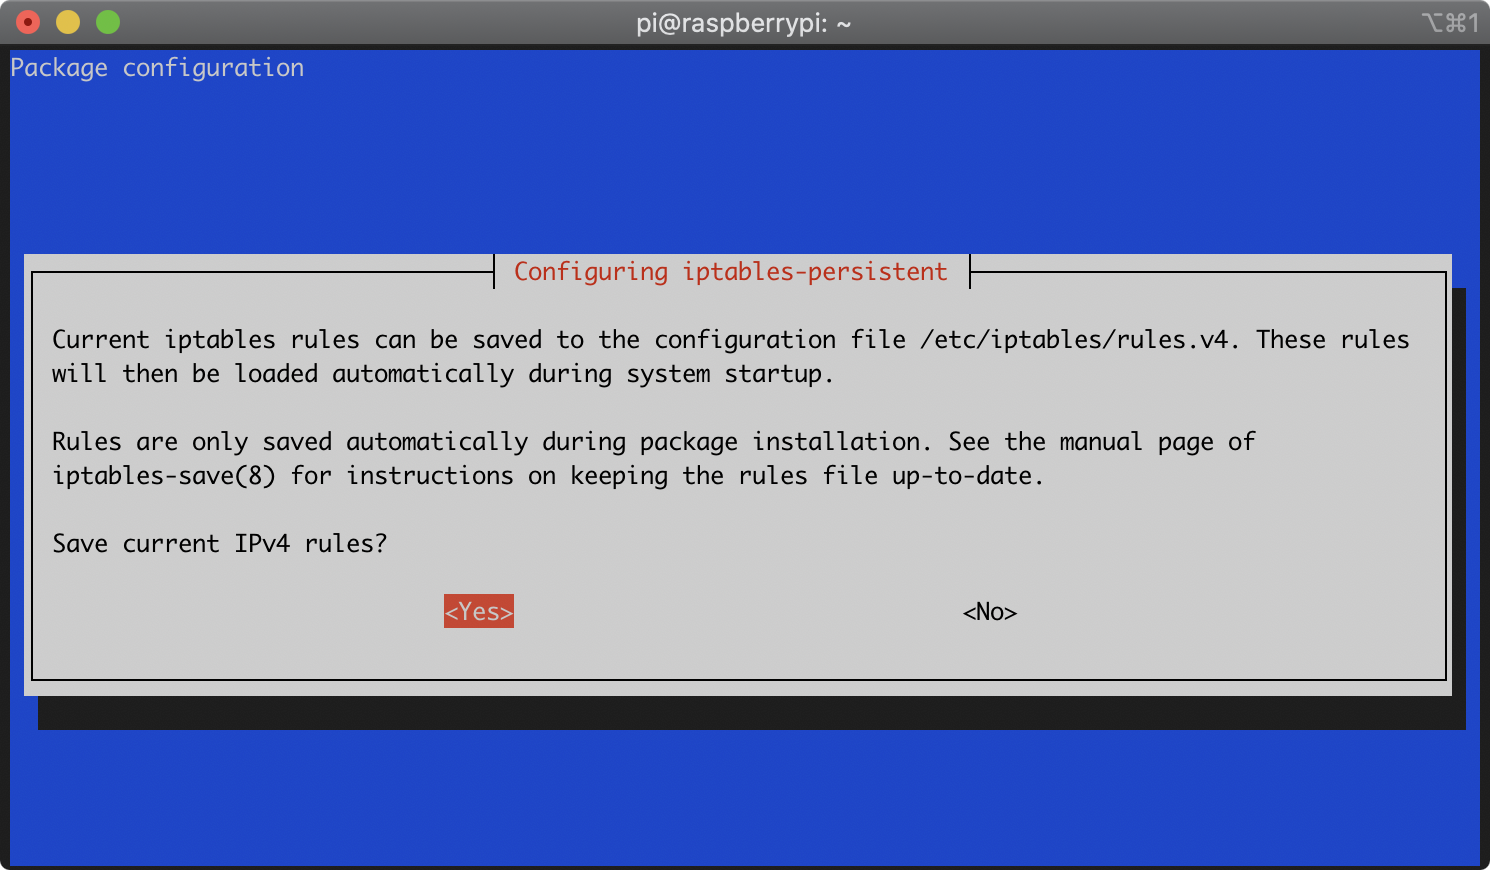
During the installation of the iptables-persistent package, you will be asked whether you’d like to save the current iptables rules. It will prompt you separately for both IPv4 and IPv6 rules. For each prompt, select ‘Yes’ with the arrow keys and press Enter:

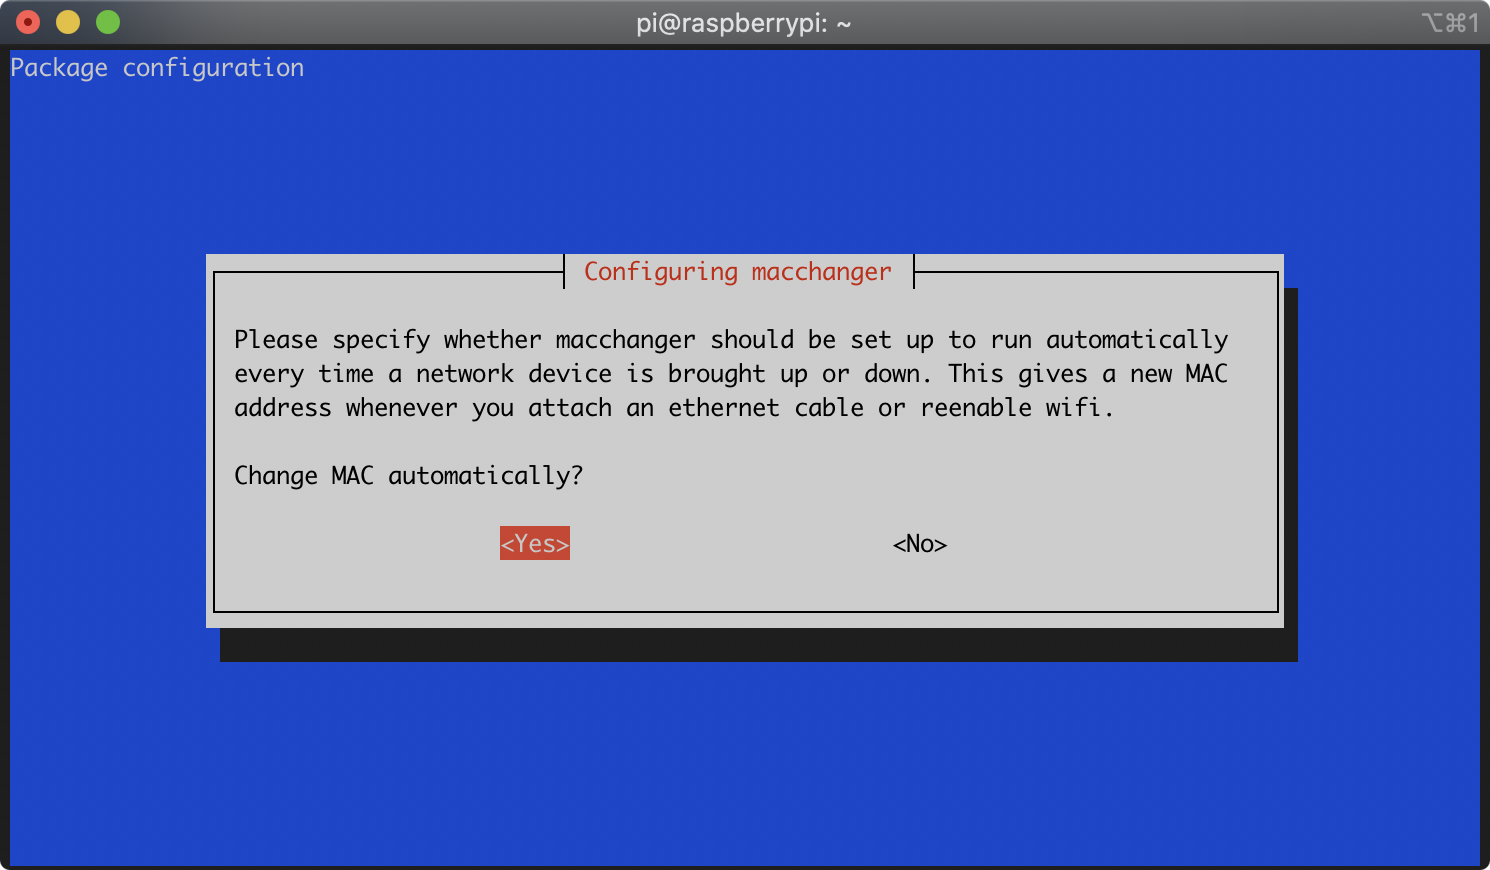
During the installation of the macchanger package, you will be asked whether you’d like macchanger to run automatically. Select ‘Yes’ with the arrow keys and press Enter:
Here’s what you’re installing and why:
- apache2 - This is the web server that will serve up your content
- libapache2-mod-wsgi - This allows you to run your python app as a web app using a Web Server Gateway Interface interface to Apache.
- bridge-utils - Utilities for creating network bridge interfaces. Although hostapd can create the bridge interface for you, it doesn’t give you control over the IP address of the interface. Because you need to fix the bridge’s IP address, you have to create and configure the interface manually with the tools in this package.
- dnsmasq - This provides DNS and DHCP services. You’ll configure this to hijack all DNS requests and give responses that direct browsers to your web server.
- git - This is needed to clone the repository that contains setup scripts and configuration files. (If you’re planning to do all of the setup by hand, you don’t need this)
- hostapd - This allows you to create a WiFi access point.
- iptables-persistent - This allows you to store routing rules in a configuration file that is loaded upon startup. This prevents us from having to manually hack the rules into a startup script.
- libapache2-mod-wsgi - This is an Apache module that allows you to host a Python web application.
- macchanger - This will randomly change your Raspberry Pi’s WiFi MAC address. This makes it difficult for someone to track your Rogue AP or to blacklist it by its MAC address.
- python-pip - This is a Python package installer. It’s needed to install the Python web app that will control what your Rogue AP actually does.
- python-flask - This is a powerful, but lightweight web framework for Python. You can use it to make your Rogue AP do all sorts of fun stuff.
When the installation finishes, restart the Raspberry Pi:
sudo reboot
Configuring your Rogue AP
The Quick Way
To configure the system to run the rogue access point, all you need to do is download a repository from GitHub and run the installer. To do this, use these commands (you will be prompted for the name of the WiFi network that your Rogue AP will create):
git clone https://github.com/jerryryle/rogue_ap.git
cd rogue_ap
sudo ./setup.sh
sudo reboot
Once you do this, your Raspberry Pi will lose internet access since you have converted its wireless hardware from a WiFi client to an Access Point.
If you need to restore WiFi so that you can access the internet from your Raspberry Pi, you can use the restore_wifi.sh script to disable the Rogue AP and reconnect to your WiFi network. To do this, run these commands (you will be prompted for your WiFi SSID and password):
cd rogue_ap
sudo ./restore_wifi.sh
sudo reboot
The Manual Way
Configure the Web Server to Run an App
First, you’ll want to install your web application and get it running under Apache. The github repo associated with this project contains a skeleton Flask-based app that’s intended to run under Apache. You can clone the repo and use it or build your own app. If you want to use a different framework, language, or web server, the configuration is up to you and you can skip over this section.
To install a Flask-based app, switch to the app’s folder (“rogueap” in the github repo) and run this command:
pip install --upgrade --no-deps --force-reinstall .
The --upgrade --no-deps --force-reinstall flags ensure that the app is upgraded to any newer version if it’s already installed, that its dependencies are not reinstalled, and that the app will be reinstalled even if it’s already installed and there’s no newer version. This attempts to guarantee that any changes to your app get installed whenever you run this command.
To configure Apache to run the installed Flask app, follow these instructions: http://flask.pocoo.org/docs/0.12/deploying/mod_wsgi/. In a nutshell, you need to create a .wsgi file that imports your installed app and change your Apache site’s VirtualHost configuration to run it. The linked instructions should walk you through all of this, but you can also inspect the files in this project’s github repo to see how I configured it.
Configure the Web Server to Fool Captive Portal Detection
First, you need to add a directory rule to allow .htaccess overrides within the /var/www folder. This lets you add .htaccess files with rules for redirecting special URLs. To allow overrides, create/edit the file /etc/apache2/conf-available/override.conf with this command:
sudo nano /etc/apache2/conf-available/override.conf
Add these lines:
<Directory /var/www/>
    Options Indexes FollowSymLinks MultiViews
    AllowOverride All
    Order Allow,Deny
    Allow from all
</Directory>
Save and exit (CTRL-X, ‘Y’).
Then enable it with this command:
sudo a2enconf override
Now enable the rewrite module with this command:
sudo a2enmod rewrite
Restart Apache to activate the new configuration with this command:
sudo systemctl restart apache2
Now you can create rules to redirect special URLs. When you connect certain devices to WiFi, they issue http requests to determine whether internet access is available. You need to ensure that we handle these requests. To do so, create an .htaccess file in your web app’s wsgi folder. If you’re using the github repo’s configuration, the following command will work (if not, you’ll need to specify the correct path to your app’s wsgi folder):
sudo nano /var/www/rogueap/.htaccess
Add these lines to the file:
Redirect /library/test/success.html /
Redirect /hotspot-detect.html /
Redirect /ncsi.txt /
Redirect /connecttest.txt /
Redirect /fwlink/ /
Redirect /generate_204 /r/204

RewriteEngine on
RewriteCond %{HTTP_USER_AGENT} ^CaptiveNetworkSupport(.*)$ [NC]
RewriteRule ^(.*)$ / [L,R=301]
Save and exit (CTRL-X, ‘Y’).
That list came from Braindead Security’s tutorial. It contains rules for the captive portal URLs that different device makers use (including one that relies on the user agent string), but it might not be a comprehensive list. The rules redirect requests to the root of the webapp (except /generate_204, which redirects to /r/204, which is configured to generate a 204 response).
Configure HostAPD to Create an Access Point
Your Raspberry Pi will lose internet access once you complete the rest of these steps, so it’s worth ensuring that the web server and your web app are up and running first.
Start by configuring HostAPD to create a wireless access point. Use this command to create/edit a HostAPD configuration file:
sudo nano /etc/hostapd/hostapd.conf
If you’re starting with a stock Raspian image, this file will not already exist, so the above command will create a new, empty file. However, if the file does already exist, remove any existing content. Enter these lines:
interface=wlan0
bridge=br0
ssid=[Your SSID]
hw_mode=g
channel=6
wmm_enabled=0
auth_algs=1
Replace “[Your SSID]” with the name of the access point you’d like to create. For example, if you’d like to create a network called “Angry Mule”, you would use:
ssid=Angry Mule
Save and exit (CTRL-X, ‘Y’).
This configuration tells HostAPD to create an access point on wlan0 using 802.11g hardware mode, channel 6, and no encryption/security. It also tells HostAPD to forward the traffic to a bridge interface named br0. HostAPD will create this bridge interface if it doesn’t exist, but it doesn’t give you a way to control the interface’s configuration. So, you’ll manually create and configure the bridge interface next.
Enable HostAPD
Use this command to edit the /etc/default/hostapd configuration file:
sudo nano /etc/default/hostapd
Look for this line:
#DAEMON_CONF=""
Replace it with this:
DAEMON_CONF="/etc/hostapd/hostapd.conf"
Save and exit (CTRL-X, ‘Y’). Then run these commands:
sudo systemctl unmask hostapd
sudo systemctl enable hostapd
This enables the HostAPD service using your configuration file at /etc/hostapd/hostapd.conf
Create and Configure Bridge Interface br0
You’ll want to give the bridge interface, br0, a static IP address to make the rest of the configuration easier. While HostAPD can create the bridge interface for you, it doesn’t give you control over its configuration. Therefore, you’ll need to manually create the interface and configure it.
Begin by creating a new br0 interface configuration file with this command:
sudo nano /etc/network/interfaces.d/br0
Add the following lines to the file:
auto br0
iface br0 inet static
    address 10.1.1.1
    netmask 255.255.255.0
    pre-up brctl addbr br0
    post-down btctl delbr br0
Save and exit (CTRL-X, ‘Y’).
This manually creates the bridge interface br0 with the static IP address 10.1.1.1. The pre-up and post-down commands use the bridge tools to add and remove the bridge interface when it is brought up or down, respectively.
Enable IP Forwarding
You’ll need to configure the kernel to allow IP forwarding so that we can forward access point traffic to the bridge interface. To do this, edit the sysctl configuration file with this command:
sudo nano /etc/sysctl.conf
Look for the following line that’s been disabled with a comment character:
#net.ipv4.ip_forward=1
Remove the comment character (‘#’) so that it looks like this:
net.ipv4.ip_forward=1
Save and exit (CTRL-X, ‘Y’).
Configure iptables to Forward DNS and HTTP to br0
You need to set up forwarding of DNS and HTTP traffic from the access point to the bridge interface. Begin by editing the /etc/iptables/rules.v4 file with this command:
sudo nano /etc/iptables/rules.v4
Replace any existing content with this:
*nat
:PREROUTING ACCEPT [0:0]
:INPUT ACCEPT [0:0]
:OUTPUT ACCEPT [0:0]
:POSTROUTING ACCEPT [0:0]
-A PREROUTING -i br0 -p udp -m udp --dport 53 -j DNAT --to-destination 10.1.1.1:53
-A PREROUTING -i br0 -p tcp -m tcp --dport 80 -j DNAT --to-destination 10.1.1.1:80
-A PREROUTING -i br0 -p tcp -m tcp --dport 443 -j DNAT --to-destination 10.1.1.1:80
-A POSTROUTING -j MASQUERADE
COMMIT
*filter
:INPUT ACCEPT [0:0]
:FORWARD ACCEPT [0:0]
:OUTPUT ACCEPT [0:0]
COMMIT
Save and exit (CTRL-X, ‘Y’).
TODO: Explain
Configure DNSmasq
Next, you’ll configure DNSmasq to handle DNS and DHCP for your access point. Begin editing the configuration file with this command:
sudo nano /etc/dnsmasq.conf
You can completely remove any existing file contents and replace them with this:
interface=br0
listen-address=10.1.1.1
no-hosts
dhcp-range=10.1.1.2,10.1.1.254,72h
dhcp-option=option:router,10.1.1.1
dhcp-authoritative

address=/#/10.1.1.1
The first few lines tell DNSmasq to listen for traffic on the bridge interface br0 and IP address 10.1.1.1. The DHCP lines allow the Raspberry Pi to hand out IP addresses to any devices that connect to its access point, and in turn they will treat the Raspberry Pi as their authoritative gateway to the internet. The “address” line redirects DNS traffic from all domains to the Raspberry Pi’s IP address. This means that any domain name request made by connected clients will be directed to the Raspberry Pi’s IP address. If–for example–a connected client tries to visit http://www.microsoft.com, they’ll be directed to the Raspberry Pi’s web server. Note that the only service we’ve set up thus far is http. So, if a client tries to telnet or ssh to www.microsoft.com, the request will time out and fail. Or, more importantly, if a client tries to visit https://www.microsoft.com, the request will time out and fail. You can configure Aapche to host an https server on the Raspberry Pi; however, because you (probably) can’t spoof certificates for other websites, client web browsers will pop up big security warnings about invalid certificates and try hard to prevent users from proceeding to your rogue server. So, it’s probably not worth the effort to bother with https (this is also another good reason to prefer https when you’re surfing the web).
Enable DNSmasq
Use this command to edit the /etc/default/dnsmasq configuration file:
sudo nano /etc/default/dnsmasq
Look for this line (note: it might already be set to ENABLED=1):
ENABLED=0
Replace it with this:
ENABLED=1
Save and exit (CTRL-X, ‘Y’). Then run this command:
sudo systemctl enable dnsmasq
This ensures that the DNSmasq service is enabled.
Disable dhcpcd
You’re going to use DNSmasq for both DNS and DHCP, so disable the dhcpcd service that’s enabled by default on the Raspberry Pi. Use this command:
sudo update-rc.d dhcpcd disable
Disable WPA Supplicant
Edit the WPA Supplicant configuration file with this command:
sudo nano /etc/wpa_supplicant/wpa_supplicant.conf
Remove or comment out the entire network section you previously added:
#network={
#    ssid="WiFi Network"
#    psk="password"
#}
Save and exit (CTRL-X, ‘Y’).
Reboot and Test
Reboot the Raspberry Pi with this command
sudo reboot
Once the Raspberry Pi boots, you should be able to see and connect to an unsecured access point with the name you selected. Once connected, if you go to an http website (try something like http://moo.com), you should be redirected to your web app.
Have fun!