Building a Rogue Captive Portal with the Raspberry Pi
Mar 23, 2023 - Update: Rogue Portal has now been tested and confirmed working with Raspberry Pi OS based on Debian version: 11 (bullseye).
I previously created a “Rogue Access Point” (see project here) that made a Raspberry Pi Zero W act as a WiFi hotspot and serve up a Python web app to anyone who connected to it. That implementation specifically attempted to fool captive portal detection on devices so that they wouldn’t pop up a captive portal connection dialog after connecting to the WiFi access point. It would then route all traffic to the Python web app so that when a user attempted to visit a website (for example, http://google.com) they would see the app instead.
That exercise was fun, but the push to use HTTPS everywhere detracted from its usefulness. Because the Rogue Access Point can’t have valid HTTPS certificates for most websites, the user is presented with a big security warning when they attempt to access any site via HTTPS. And, since many browsers now try HTTPS first, this makes the Rogue Access Point useless (Hooray! The internet is getting better).
So, I decided to create a “Rogue Captive Portal.” This will intentionally not fool captive portal detection on devices so that they do pop up the captive portal connection dialog after connecting to the WiFi access point. This (currently) will happily show HTTP content, so you’re able to harass users with entertaining messages or present something that looks like a sign-in page to steal their credentials (but don’t do that).
I built upon the Rogue Access Point project, but made a few significant changes:
- I built a Debian package instead of a hackish install script.
- I figured out how to create the access point with wpa_supplicant instead of installing hostapd.
- I used nginx instead of Apache and configured it only to serve static content. Serving a web app is left as an exercise for the reader.
- I created a “fast boot” package that makes a few tweaks to the Raspberry Pi OS configuration to speed up the boot process. This is by no means comprehensive and could probably use more work to boot as fast as possible.
Table of Contents
- Building a Rogue Captive Portal with the Raspberry Pi
- Table of Contents
- Preparation
- Deploy the pre-built Debian packages
- Build and Deploy the Debian packages from source
- Manually create the Rogue Portal
- A brief explanation of how the Rogue Portal works
- Install additional dependencies
- Configure the Web Server to serve the captive portal redirects and your content
- Create a
wpa_supplicantconfiguration to create an access point - Disable the
wpa_supplicantservice - Configure
dhcpcdto createwlan0as an access point with a static IP - Enable IP Forwarding
- Configure iptables to accept DHCP, DNS, and HTTP requests on
wlan0and reject everything else - Configure
dnsmasq - Tell
dnsmasqstartup script not to use the loopback interface - Enable
dnsmasq - Reboot and Test
Preparation
This section walks you through what you’ll need to get a fully-updated copy of Raspberry Pi OS running on your Raspberry Pi, along with a WiFi connection. You’ll need this either to deploy the pre-built Debian packages or to do development. If you have a Raspberry Pi model that supports a wired network connection, you can use that instead of setting up WiFi–in fact, you’ll find this more convenient once you convert wlan0 to an access point and lose internet access on that interface.
Components
You will need the following:
- Raspberry Pi - Any Raspberry Pi model should work as long as it has a wireless adapter on
wlan0(either built in or connected via USB) - Micro SD card - Use at least a 4GB class 10 card
- WiFi or wired network with internet connection
- Computer with SD card reader to download Raspberry Pi OS and install it onto the SD card
- Computer or phone with WiFi to test the Rogue Portal
You will likely want the following:
- AC adapter for power
- HDMI-compatible monitor or TV and HDMI cable
- Keyboard
If using a Raspberry Pi Zero, you will also likely want Mini HDMI and micro USB OTG adapters and 2A AC adapter for power (kits like this contain a Raspberry Pi Zero W along with the cable adapters and power adapters you’ll need)
Create a Raspberry Pi OS SD Card
First, you need to get the Raspberry Pi up and running with a stock Raspberry Pi OS Linux distribution. Raspberry Pi has made this easy with their Raspberry Pi Imager software. Begin by downloading that software here: https://www.raspberrypi.com/software
Insert the SD card in your computer’s reader and run the Raspberry Pi Imager.
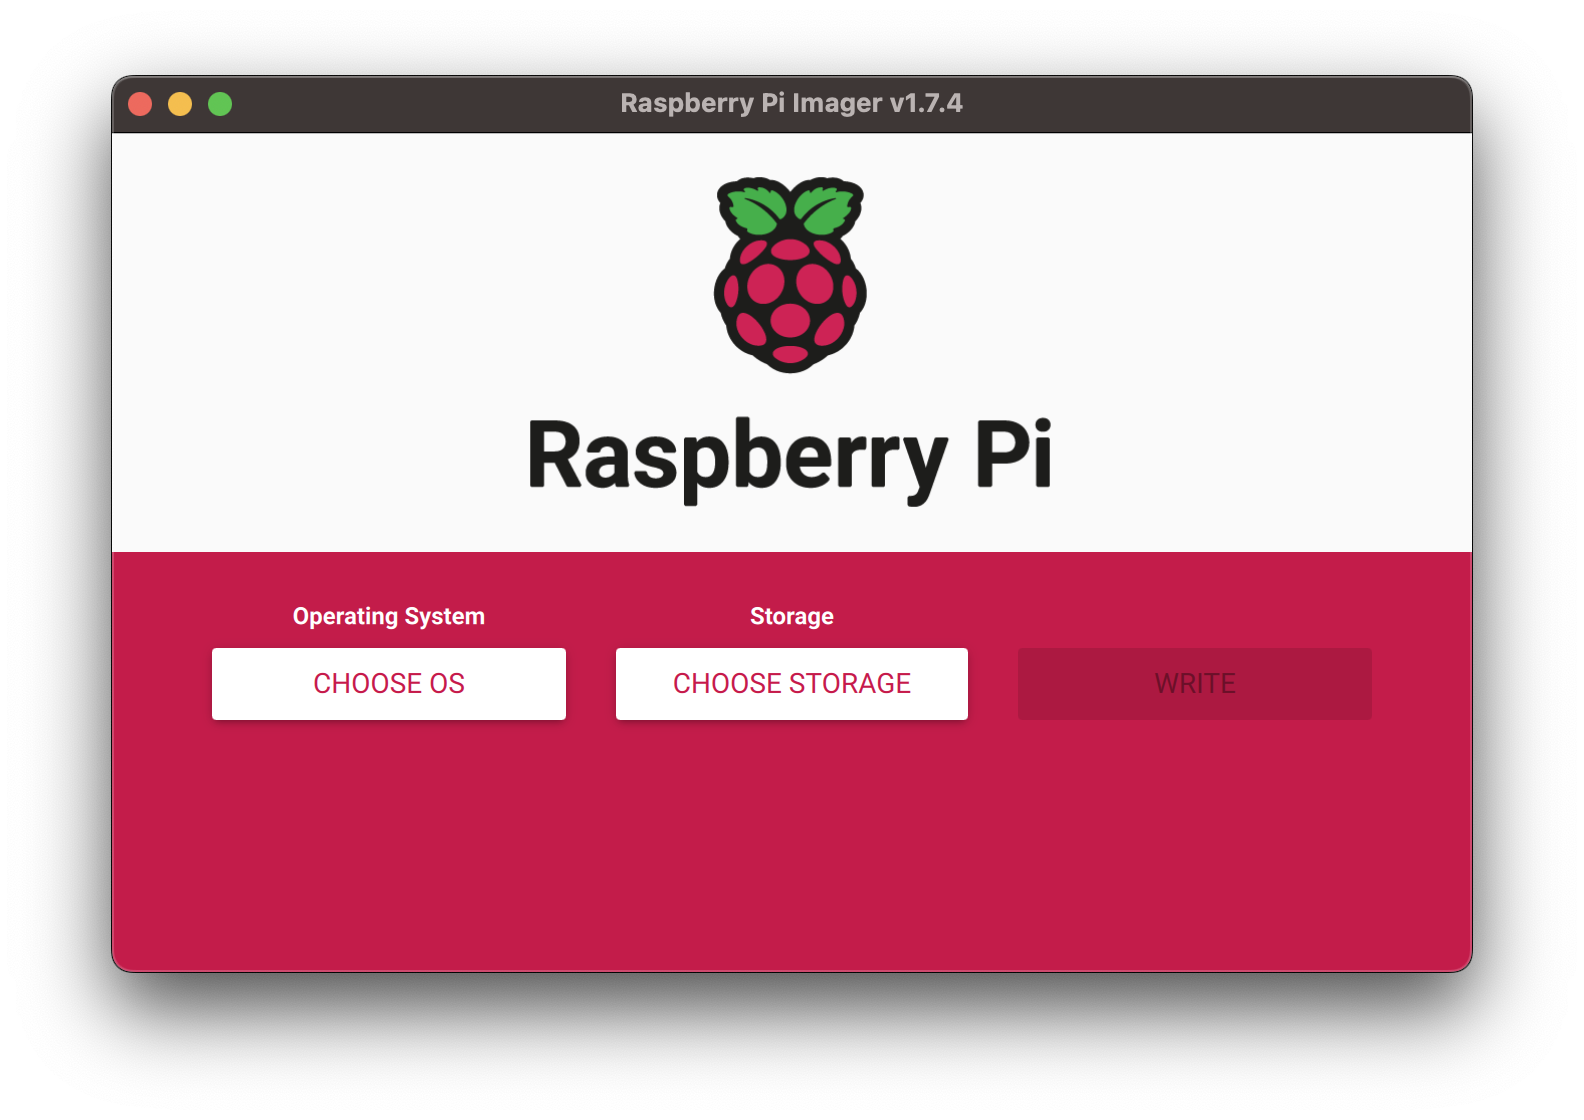
Click the “CHOOSE OS” button and select your desired Raspberry Pi OS. I recommend “Raspberry Pi OS Lite (32-bit),” which you’ll find under the “Raspberry Pi OS (other)” menu. I recommend the 32-bit version because it works on older models of Raspberry Pi hardware that don’t have 64-bit support. Additionally, I only provide pre-built packages for the 32-bit version. If you want 64-bit support, you’ll need to follow my instructions in this document for building the packages yourself.
Once you’ve chosen your OS, a gear icon will appear. From here, you can pre-configure some aspects of the OS.

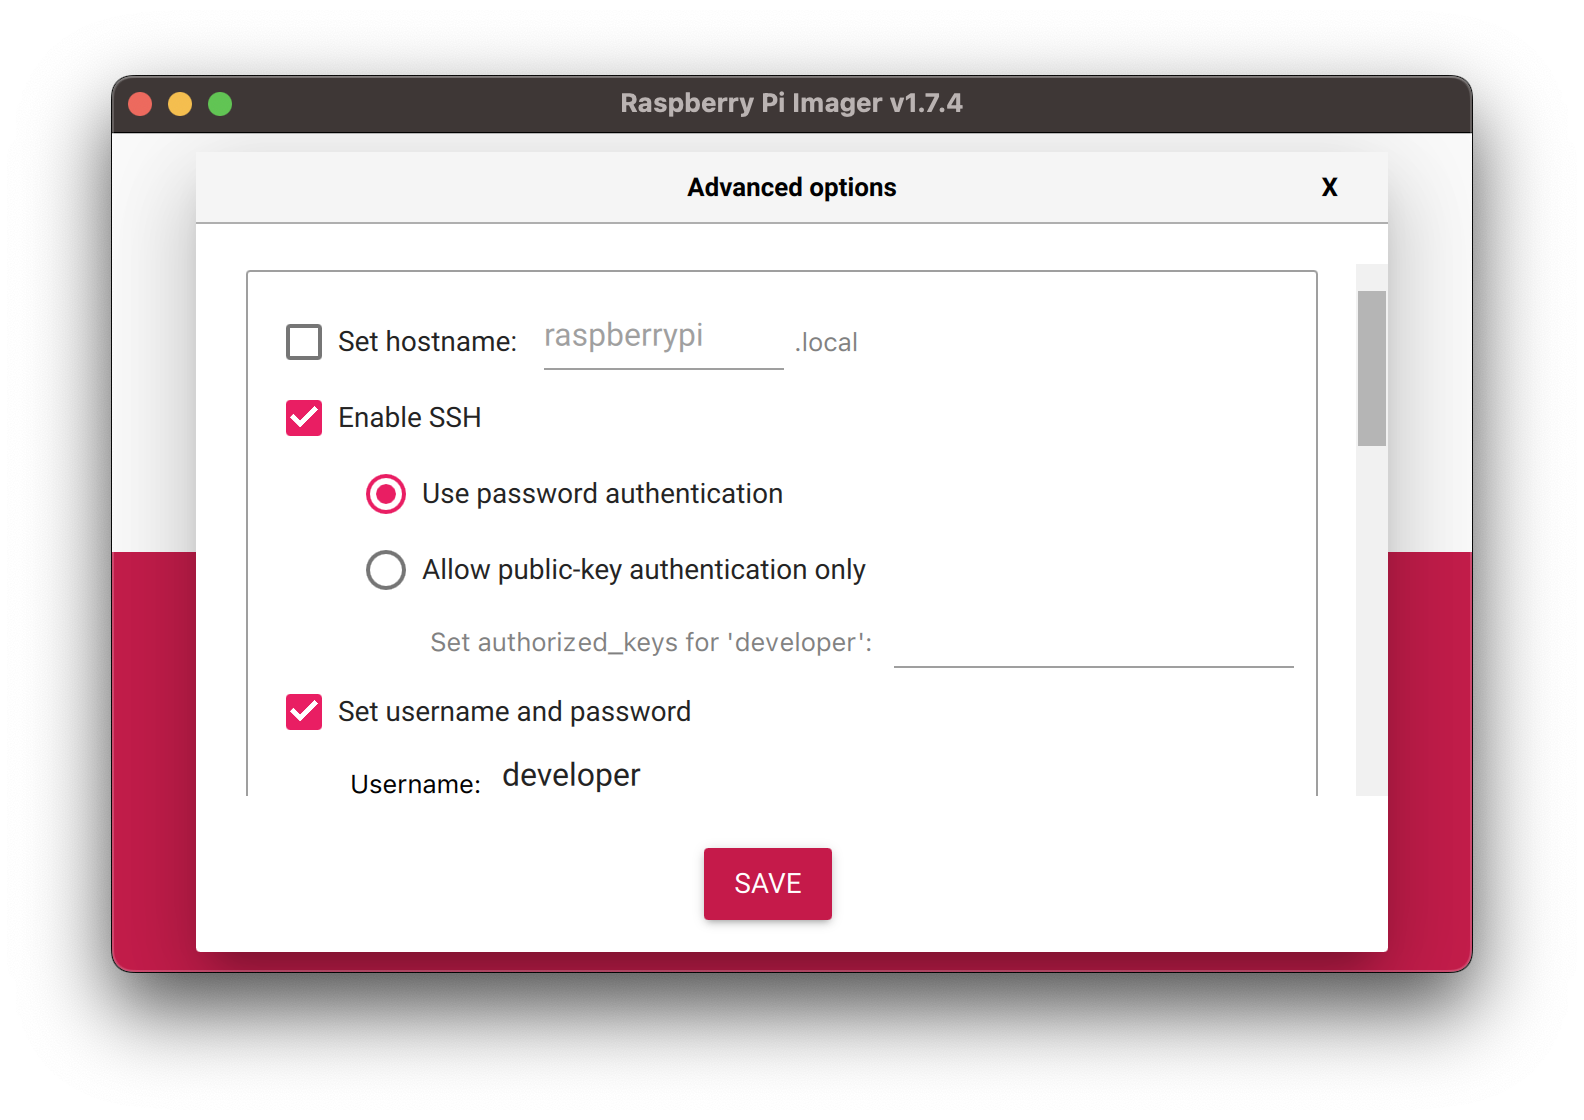
This is extremely handy. I recommend enabling SSH, choosing a username and password, and setting up WiFi.
When you’re ready to create your SD card, click the “WRITE” button. When the Raspberry Pi Imager has finished writing the image, remove the SD card from your computer, plug it into the Raspberry Pi, connect a keyboard and monitor, and plug in the AC adapter. The system should boot to a login prompt. If you did not configure your own username/password, log in using the default username pi and password raspberry.
Set up a WiFi connection for internet access
If you configured WiFi using the Raspberry Pi Imager and it seems to be working, you can skip this entire section!
In order to update and configure the device, you’ll want an internet connection so that you can upgrade Raspberry Pi OS and download the necessary, additional packages. If you have a Raspberry Pi model with wired Ethernet, you can use that and skip this step. Otherwise, you’ll need to configure the Raspberry Pi to connect to your WiFi network. You can either run sudo raspi-config and configure your network from the GUI or do it manually with the following steps.
Open the wireless configuration with this command:
sudo nano /etc/wpa_supplicant/wpa_supplicant.conf
Replace the contents of the file with the following, substituting the name of your local access point and its corresponding password:
ctrl_interface=DIR=/var/run/wpa_supplicant GROUP=netdev
update_config=1
country=US

network={
    ssid="WiFi Network"
    psk="password"
}
To save the file and exit, type Ctrl-X, then y, then Enter. Then, enter the following command to load the new network configuration:
sudo service networking restart
At this point, you might wish to enable ssh and perform as much of the the remaining configuration as possible over ssh. Setting this up is outside the scope of this document, but check out the “Interfacing Options” menu in the configuration tool invoked with sudo raspi-config. You can also enable SSH by creating an empty file called “SSH” in the root of the “boot” partition after you have prepared your Rasberry Pi OS SD Card.
Update Raspberry Pi OS
This step is optional, but recommended to ensure you have the latest security patches. The base Raspberry Pi OS images used to create your SD card quickly go out of date and there are usually a number of updates to apply.
Update the system with the following command:
sudo apt update && sudo apt dist-upgrade -y
Reboot after the update has completed:
sudo reboot
Next steps
There are three paths you can take from here:
- You can deploy pre-built Debian packages onto your Raspbery Pi if you just want to quickly get a Rogue Portal up and running and perhaps tweak the content that it serves.
- You can build and deploy the Debian packages from source if you’re interested in getting set up with a development environment that lets you build your own packages with custom content or customized configuration changes.
- You can manually create the Rogue Portal if you’re interested in understanding the details of what is needed to create one.
You can scroll back up to the TOC to quickly find the sections for each of these paths.
Deploy the pre-built Debian packages
This section will show you how to deploy the pre-built Debian packages to create the Rogue Portal. Use this method if you just want to get a Rogue Portal up & running quickly and then add your own files to the web server.
Download the packages
From your home folder, run the following to fetch the latest release packages:
wget https://github.com/jerryryle/rogueportal/releases/download/v1.4/rogueportal_1.4_armhf.deb
wget https://github.com/jerryryle/rogueportal/releases/download/v1.4/roguefastboot_1.4_armhf.deb
I try to remember to update this documentation with the proper URLs when there are new releases, but you can double-check the Github project for the latest version.
Install the packages
Use the following to set configuration options for the macchanger and iptables-persistent packages (you can skip this step, but then you must select “yes” for each of these options when prompted during installation):
sudo debconf-set-selections <<< "macchanger macchanger/automatically_run boolean true"
sudo debconf-set-selections <<< "iptables-persistent iptables-persistent/autosave_v6 boolean true"
sudo debconf-set-selections <<< "iptables-persistent iptables-persistent/autosave_v4 boolean true"
Optionally, use the following to set the WiFi SSID you would like the Rogue Portal to use (in the command below, replace “Your SSID” with your preferred SSID.):
sudo debconf-set-selections <<< "rogueportal rogueportal/ssid string Your SSID"
You can skip this step to be prompted for the SSID during installation.
Install the Rogue Portal and Fast Boot packages:
sudo apt install ./rogue*.deb
If you would like to add your own HTML or media, drop the files into /var/www/html/. The configuration currently expects this folder to contain an “index.html” so you must either provide this file–overwriting the one that’s included in the source–or change the nginx configuration to expect differently, which is outside the scope of this document.
Reboot to activate the Rogue Portal
sudo reboot
Once you reboot, your Raspberry Pi may lose internet access since you have converted its wireless hardware from a WiFi client to an Access Point. However, if your Raspberry Pi has an additional, wired network connection, you can continue to use it. After the Raspberry Pi boots, you should see the SSID that you chose and connecting to it should pop open your content in a captive portal connection dialog.
Remove the packages
If you need to restore WiFi so that you can access the internet from your Raspberry Pi, you can remove the Rogue Portal configuration.
Remove the Rogue Portal with:
sudo apt remove rogueportal roguefastboot --purge
Then optionally remove the installed dependencies with:
sudo apt autoremove
Build and Deploy the Debian packages from source
This section will show you how to build the Debian packages from source and then deploy them. Use this method if you want to modify the packages for your own purpose–perhaps to change the configuration or include your own files.
Install additional dependencies
Install the additional required packages:
sudo apt install git build-essential debhelper config-package-dev
Here’s what you’re installing and why:
- git - This is needed to clone the repository that contains setup scripts and configuration files.
- build-essential - This includes packages needed to compile software and build Debian packages.
- debhelper - This includes tools for building Debian packages. You’ll need this to build the Rogue Portal package.
- config-package-dev - This includes tools that allow our Debian package to replace configuration files that were provided by other packages. These tools will allow us to easily revert the changes when our package is removed. You’ll need this to build the Rogue Portal package.
Clone the Rogue Portal source
Clone the Rogue Portal source repo. If you just want to clone and build, use HTTPS instead of SSH so you don’t need to set up keys on the Raspberry Pi. From your home folder:
git clone https://github.com/jerryryle/rogueportal.git
Make Changes to the Source
Assuming you’d like to build custom packages for your own deployment, now is where you’d make any desired changes to the source configuration and/or files before packaging them up.
For example, to add your own HTML or media, drop the files into ./rogueportal/files/var/www/html/. The configuration currently expects this folder to contains an “index.html” so you must either provide this file–overwriting the one that’s included in the source–or change the nginx configuration to expect differently, which is outside the scope of this document.
Build the Packages
Still from your home folder, build with the following command:
(cd rogueportal && dpkg-buildpackage --no-sign)
The parentheses spawn a subshell so that the directory change is temporary. We do this because the build places the output up outside of the source folder, so this will save us from switching into the source folder to build and then back out to install the packages.
The -no-sign switch specifies that we don’t want to sign the packages. I do this to avoid documenting how to set up and manage signing keys, which is a complex topic that I’d like to keep out of scope.
Install the packages
Use the following to set configuration options for the macchanger and iptables-persistent packages (you can skip this step, but then you must select “yes” for each of these options when prompted during installation):
sudo debconf-set-selections <<< "macchanger macchanger/automatically_run boolean true"
sudo debconf-set-selections <<< "iptables-persistent iptables-persistent/autosave_v6 boolean true"
sudo debconf-set-selections <<< "iptables-persistent iptables-persistent/autosave_v4 boolean true"
Optionally, use the following to set the WiFi SSID you would like the Rogue Portal to use (in the command below, replace “Your SSID” with your preferred SSID.):
sudo debconf-set-selections <<< "rogueportal rogueportal/ssid string Your SSID"
You can skip this step to be prompted for the SSID during installation.
Install the Rogue Portal and Fast Boot packages:
sudo apt install ./rogue*.deb
Reboot to activate the Rogue Portal
sudo reboot
Once you reboot, your Raspberry Pi may lose internet access since you have converted its wireless hardware from a WiFi client to an Access Point. However, if your Raspberry Pi has an additional, wired network connection, you can continue to use it. After the Raspberry Pi boots, you should see the SSID that you chose and connecting to it should pop open your content in a captive portal connection dialog.
If you need to restore WiFi so that you can access the internet from your Raspberry Pi, you can remove the Rogue Portal configuration.
Remove the Rogue Portal with:
sudo apt remove rogueportal roguefastboot --purge
Then optionally remove the installed dependencies with:
sudo apt autoremove
Manually create the Rogue Portal
This section will show you how to manually configure Raspberry Pi OS to be a Rogue Portal without using the Debian packages. It primarily serves to document the configuration that the Debian packages do.
A brief explanation of how the Rogue Portal works
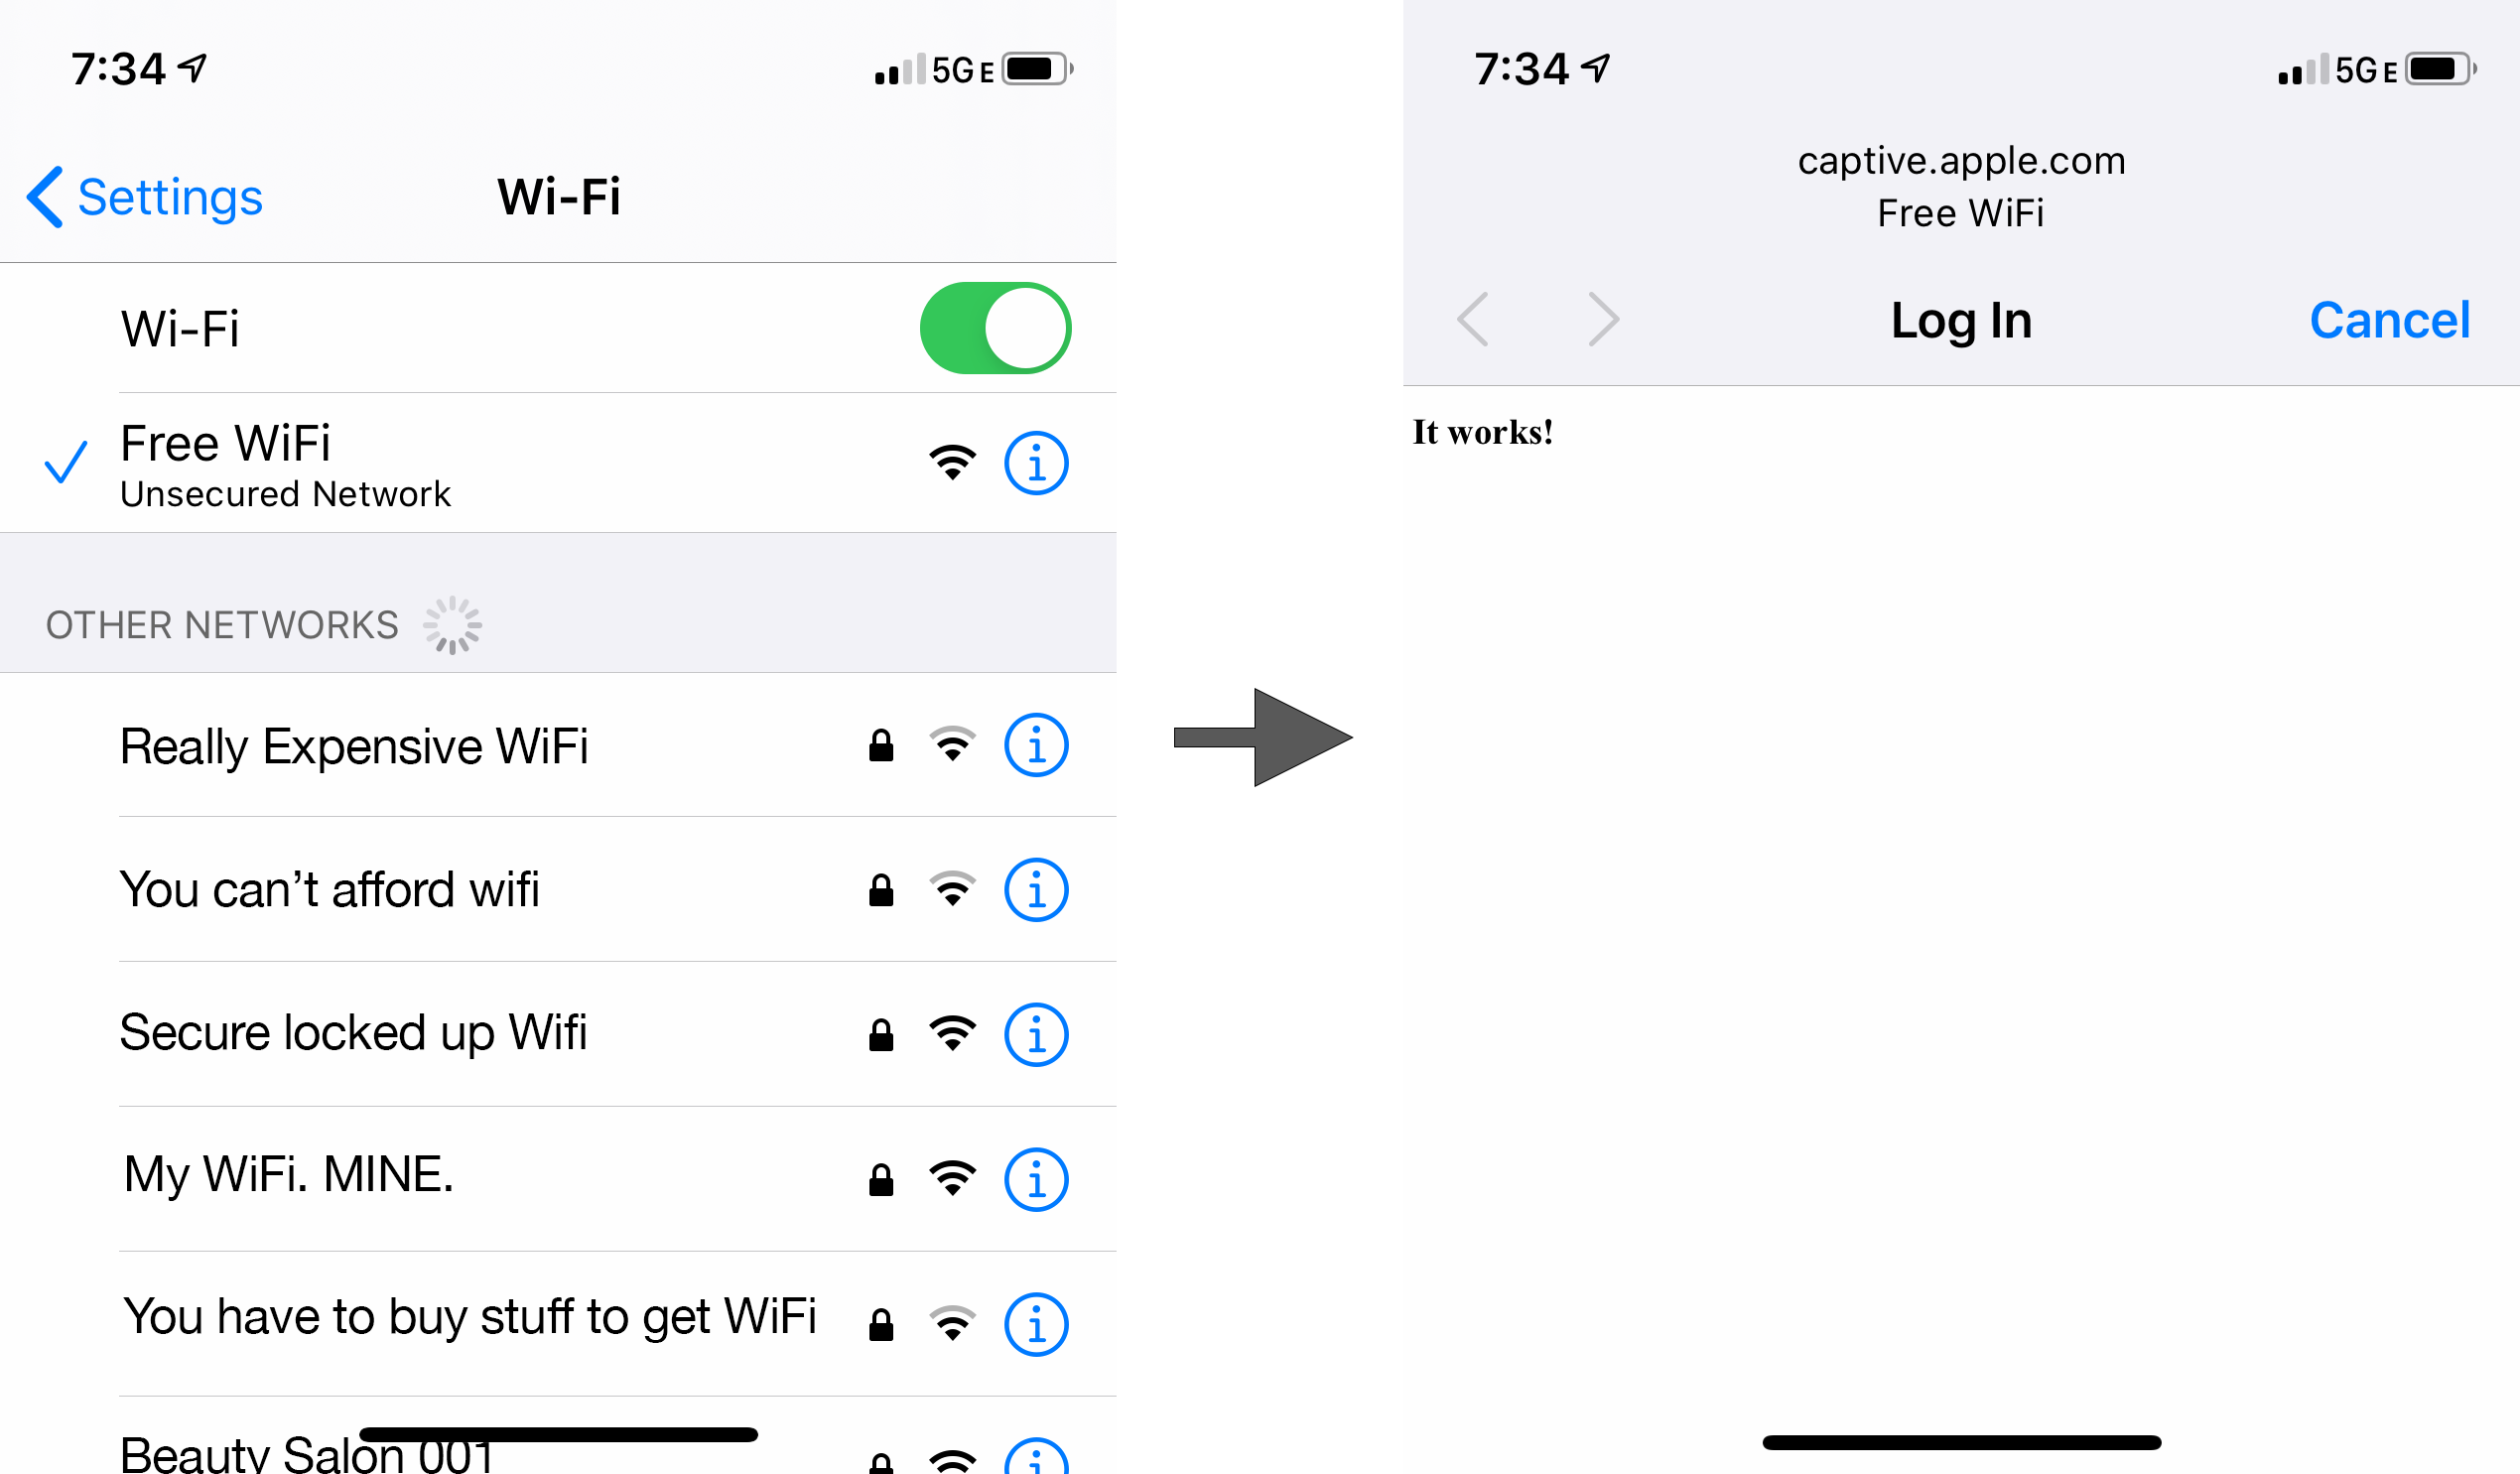
After connecting to a new WiFi network, a device will first request a specific “known good” test URL to see if it can reach the internet. If it gets the response its expecting, it will infer that it is connected to the internet and do nothing.
If the device receives a response that contains a redirect to a new URL, it assumes that it cannot yet reach the internet, but that there is a “captive portal” in place with which the user needs to interact before internet access is granted. The device will pop up a special captive portal window, which is a web client that will be pointed to the new URL received in the redirect. The intent is to let the user access content served up by the captive portal so that they can accept a usage agreement or make a payment for internet access. But we can use this feature to serve up arbitrary content from the Raspberry Pi with no intention of ever proceeding to allow internet access.
Install additional dependencies
Install the additional required packages:
sudo apt install dnsmasq iptables-persistent macchanger nginx
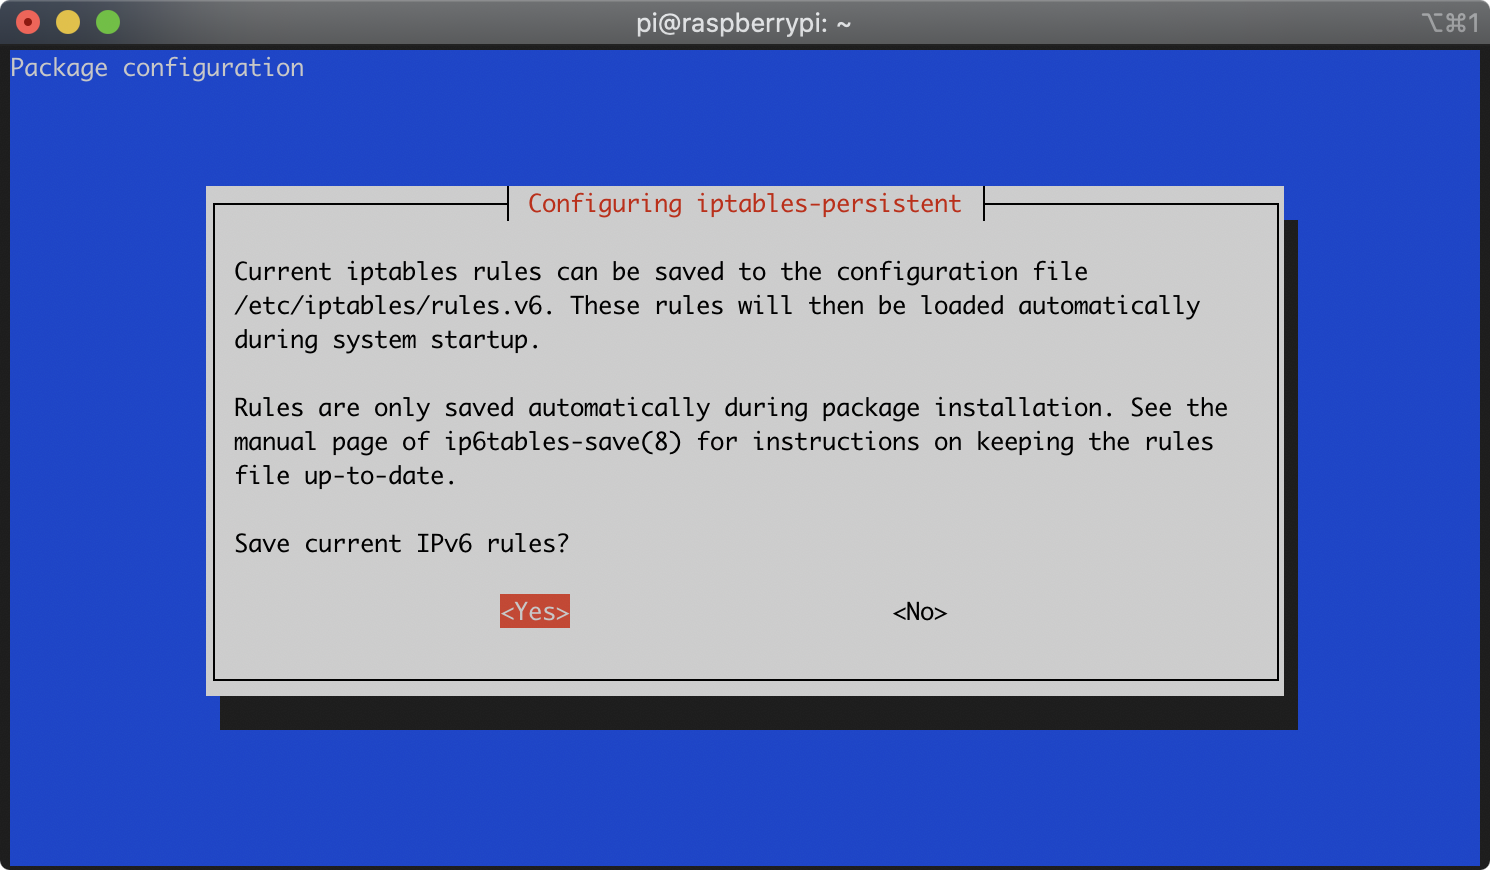
During the installation of the iptables-persistent package, you will be asked whether you’d like to save the current iptables rules. It will prompt you separately for both IPv4 and IPv6 rules. For each prompt, select ‘Yes’ with the arrow keys and press Enter:

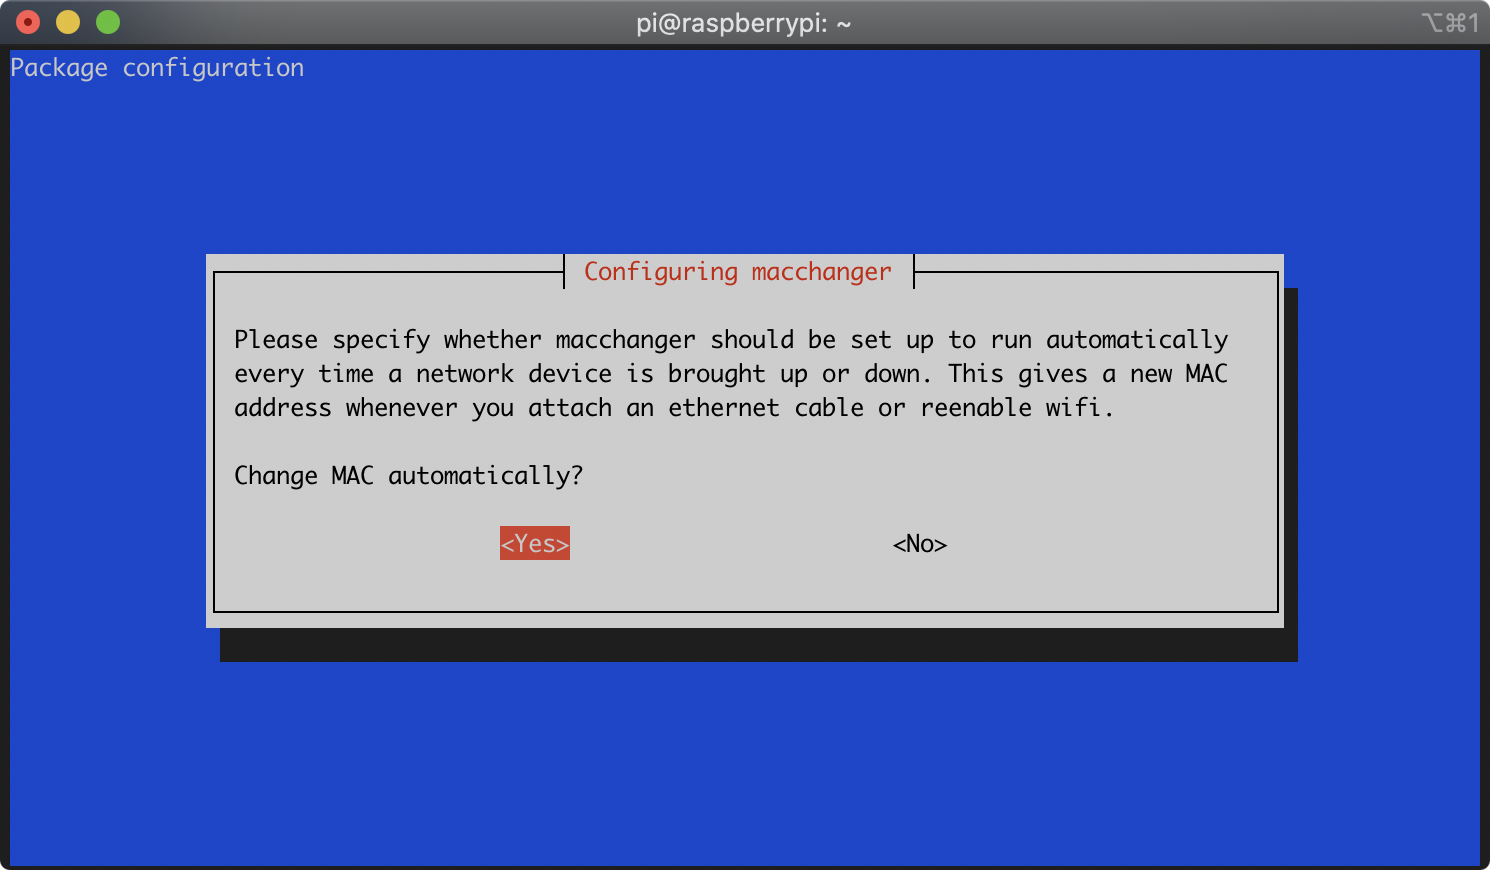
During the installation of the macchanger package, you will be asked whether you’d like macchanger to run automatically. Select ‘Yes’ with the arrow keys and press Enter:
Here’s what you’re installing and why:
- dnsmasq - This provides DNS and DHCP services. You’ll configure this to hijack all DNS requests and give responses that direct browsers to your web server.
- iptables-persistent - This allows you to store routing rules in a configuration file that is loaded upon startup. This prevents us from having to manually hack the rules into a startup script.
- macchanger - This will randomly change your Raspberry Pi’s WiFi MAC address. This makes it difficult for someone to track your Rogue AP or to blacklist it by its MAC address.
- nginx - This is the web server that will serve up your content
When the installation finishes, restart the Raspberry Pi:
sudo reboot
Configure the Web Server to serve the captive portal redirects and your content
Open the default nginx site configuration with the following:
sudo nano /etc/nginx/sites-available/default
Change it to the following content:
# Default server configuration
# This handles any request not made using the go.rogueportal server name and
# serves a redirect to go.rogueportal.
server {
    listen 80 default_server;
    listen [::]:80 default_server;
    server_name _;

    # Only allow GET, HEAD, POST
    if ($request_method !~ ^(GET|HEAD|POST)$) { return 444; }

    # Logs
    access_log /var/log/nginx/rogueportal_redirect.access.log;
    error_log /var/log/nginx/rogueportal_redirect.error.log warn;

    # Handle iOS
    if ($http_user_agent ~* (CaptiveNetworkSupport) ) {
        return 302 http://go.rogueportal;
    }

    # Default redirect for any unexpected requests to trigger captive portal
    # sign in screen on device.
    location / {
        return 302 http://go.rogueportal;
    }
}
Create a new nginx site configuration with the following:
sudo nano /etc/nginx/sites-available/roguecontent
Add the following content:
# The go.rogueportal server
# This handles any request that includes go.rogueportal as the server name.
# You can update this to serve your own content, proxy to another server, etc.
server {
    listen 80;
    listen [::]:80;
    server_name go.rogueportal;

    # Only allow GET, HEAD, POST
    if ($request_method !~ ^(GET|HEAD|POST)$) { return 444; }

    # Logs
    access_log /var/log/nginx/rogueportal.access.log;
    error_log /var/log/nginx/rogueportal.error.log warn;

    root /var/www/html;

    index index.html;

    location / {
        # First attempt to serve request as file, then
        # as directory, then fall back to displaying a 404.
        try_files $uri $uri/ =404;
    }

    # Redirect these errors to the home page.
    error_page 401 403 404 =200 /index.html;
}
Activate the new content site with:
sudo ln -s ln -s /etc/nginx/sites-available/roguecontent /etc/nginx/sites-enabled/roguecontent
Explanation of what’s added
This section briefly outlines the important additions to this file.
I’ve arbitrarily chosen go.rogueportal as the server name for the Rogue Portal. You can change this if you’d like; however, you’ll want to search through all of the projects files as you’ll need to replace it in several locations. You can choose any name you like, but it should not be a name that is used by any captive portal detection scheme. For example, using a real domain such as “apple.com” would be a bad choice because device vendors, like Apple, may use their own domains to try to detect captive portals. If you use their domain in your Rogue Portal, you may confuse devices or trigger a security warning on them.
The Rogue Portal uses the server name to determine whether a client is attempting to test the internet connection or whether the client is attempting to display captive portal content.
The nginx configuration sets up two virtual servers, both listening on port 80. The virtual server in roguecontent specifies the server_name as go.rogueportal, so it will handle any requests that include this name. For example, http://go.rogueportal/index.html. This virtual server serves up the portal content from the /var/www/html folder. The Rogue Portal project only includes a simple test index.html, but you can add your own content here. The roguecontent configuration is intentionally kept in its own file (as opposed to being lumped in the default file) so that you can easily update it for different types of content configurations without impacting the captive portal functionality.
The virtual server in default specifies the server_name as _, which makes it handle requests for any other server name. For example, http://apple.com. This virtual server assumes that any request is an attempt to test for an internet connection and it responds with a redirect to the go.rogueportal captive portal server.
So, for example, if a device requests http://apple.com/index.html, the default virtual server will handle the request and return a redirect to http://go.rogueportal. Upon receiving this redirect, the device will then request http://go.rogueportal and the roguecontent virtual server will serve up the contents of /var/www/html/index.html.
In both virtual servers, this line returns an error for any unexpected methods:
if ($request_method !~ ^(GET|HEAD|POST)$) { return 444; }
It’s a light security precaution to ensure that someone cannot execute methods we don’t expect.
In the default virtual server, these lines look for the iOS-specific method of setting the user agent to check for a captive portal and it returns the redirect that iOS expects:
    if ($http_user_agent ~* (CaptiveNetworkSupport) ) {
        return 302 http://go.rogueportal;
    }
This iOS-specific method is not be strictly necessary since we use a default redirect to catch any unexpected request and redirect it. But I’ve included it in case you’d like to see how to do something iOS-specific.
See the nginx documentation to understand the rest of the settings in these configuration files.
Test nginx before moving on
Unless your Raspberry Pi has a secondary, wired network connection, your Raspberry Pi will lose internet access once you complete the rest of the steps, so it’s worth ensuring that the web server is up and running first. From a browser on a computer or mobile device that’s on the same network as your Raspberry Pi, navigate to your Raspberry Pi’s IP address using HTTP (e.g. if your Raspberry Pi has IP address 10.0.0.6, go to http://10.0.0.6). If nginx is working, you will see the Rogue Portal’s website load. If not, go back and double-check that you followed all steps up to this point correctly.
Create a wpa_supplicant configuration to create an access point
Start by creating a configuration file that will tell wpa_supplicant to create a wireless access point. Use this command to create a new configuration file:
sudo nano /etc/wpa_supplicant/wpa_supplicant_rogueportal.conf
Enter these lines:
ctrl_interface=DIR=/var/run/wpa_supplicant GROUP=netdev
update_config=1
country=US

network={
    ssid="[Your SSID Here]"
    mode=2
    key_mgmt=NONE
    frequency=2412
}
Replace “[Your SSID Here]” with the name of the access point you’d like to create. For example, if you’d like to create a network called “Angry Mule”, you would use:
ssid="Angry Mule"
Save and exit (Ctrl-X, y, Enter).
This configuration tells wpa_supplicant to create an access point (mode=2), with no encryption/security (key_mgmt=NONE), and with a frequency of 2412Hz, which is IEEE 802.11b/g channel 1.
Disable the wpa_supplicant service
We’ll disable the default wpa_supplicant service and have dhcpcd create the wlan0 interface, starting wpa_supplicant with our configuration file.
Disable the wpa_supplicant service (the service will not stop immediately, but will not auto-start on next boot):
sudo systemctl disable wpa_supplicant
Configure dhcpcd to create wlan0 as an access point with a static IP
Open the dhcpcd configuration file with this command:
sudo nano /etc/dhcpcd.conf
At the very end of the file, add this:
env wpa_supplicant_conf=/etc/wpa_supplicant/wpa_supplicant_rogueportal.conf
interface wlan0
static ip_address=10.1.1.1/24
Save and exit (Ctrl-X, y, Enter).
Raspberry Pi OS uses dhcpcd to configure tcpip for all network interfaces, by default via DHCP. Our modifications to its configuration tell dhcpcd to bring up wlan0 with the static IP address 10.1.1.1 and to invoke wpa_supplicant with our provided wpa_supplicant_rogueportal.conf that will put wlan0 into access point mode.
Enable IP Forwarding
You’ll need to configure the kernel to allow IP forwarding so that we can forward access point traffic to the bridge interface. To do this, open the sysctl configuration file with this command:
sudo nano /etc/sysctl.conf
Look for the following line that’s been disabled with a comment character:
#net.ipv4.ip_forward=1
Remove the comment character (‘#’) so that it looks like this:
net.ipv4.ip_forward=1
Save and exit (Ctrl-X, y, Enter).
Configure iptables to accept DHCP, DNS, and HTTP requests on wlan0 and reject everything else
We want to limit traffic through wlan0 to DHCP (so WiFi clients can get an IP address from the Rogue Portal), DNS (so WiFi clients can access the Rogue Portal’s DNS server to resolve domain names), and HTTP (so WiFi clients can make HTTP requests to the Rogue Portal’s nginx web server), but we don’t want to expose services such as SSH. We’ll now set up firewall rules for this via iptables.
Begin by opening the /etc/iptables/rules.v4 file with this command:
sudo nano /etc/iptables/rules.v4
Replace any existing content with this:
*filter
:INPUT ACCEPT [0:0]
:FORWARD ACCEPT [0:0]
:OUTPUT ACCEPT [0:0]

# Accept incoming packets on existing connections on wlan0
-A INPUT -i wlan0 -m conntrack --ctstate RELATED,ESTABLISHED -j ACCEPT

# Allow incoming DNS requests on wlan0
-A INPUT -i wlan0 -p udp --dport 53 -j ACCEPT

# Allow incoming DHCP requests on wlan0
-A INPUT -i wlan0 -p udp --dport 67 -j ACCEPT

# Allow incoming HTTP requests on wlan0
-A INPUT -i wlan0 -p tcp --dport 80 -j ACCEPT

# Drop all other incoming requests on wlan0
-A INPUT -i wlan0 -j REJECT

COMMIT
Save and exit (Ctrl-X, y, Enter).
These lines ensure that the targets for all of the relevant chains in the filter table are configured to let packets through to the next stage of processing–effectively allowing all traffic through on all interfaces.
*filter
:INPUT ACCEPT [0:0]
:FORWARD ACCEPT [0:0]
:OUTPUT ACCEPT [0:0]
These lines add rules that explicitly allow specific types of traffic on wlan0.
# Accept incoming packets on existing connections on wlan0
-A INPUT -i wlan0 -m conntrack --ctstate RELATED,ESTABLISHED -j ACCEPT

# Allow incoming DNS requests on wlan0
-A INPUT -i wlan0 -p udp --dport 53 -j ACCEPT

# Allow incoming DHCP requests on wlan0
-A INPUT -i wlan0 -p udp --dport 67 -j ACCEPT

# Allow incoming HTTP requests on wlan0
-A INPUT -i wlan0 -p tcp --dport 80 -j ACCEPT
These lines reject all traffic that wasn’t explicitly allowed above.
# Drop all other incoming requests on wlan0
-A INPUT -i wlan0 -j REJECT
This line tells iptables apply the rules above.
COMMIT
A more comprehensive explanation of the above commands is out of scope for this document, but you can read more about iptables at the netfilter documentation site
Configure dnsmasq
Next, you’ll configure dnsmasq to handle DNS and DHCP for your access point. Open the configuration file with this command:
sudo nano /etc/dnsmasq.conf
You can completely remove any existing file contents and replace them with this:
listen-address=10.1.1.1
no-hosts
log-queries
log-facility=/var/log/dnsmasq.log
dhcp-range=10.1.1.2,10.1.1.254,72h
dhcp-option=option:router,10.1.1.1
dhcp-authoritative
dhcp-option=114,http://go.rogueportal/index.html

# Resolve everything to the portal's IP address.
address=/#/10.1.1.1
The DHCP lines allow the Raspberry Pi to hand out IP addresses and router (a.k.a. “default gateway”) information to any devices that connect to it. These devices will then treat the Raspberry Pi as their authoritative gateway to the internet. The “address” line redirects DNS requests for any domain to the Raspberry Pi’s IP address. This means that any domain name request made by connected WiFi clients will be directed to the Raspberry Pi’s IP address. If–for example–a connected client tries to visit http://www.microsoft.com, they’ll be directed to the Raspberry Pi’s IP address instead of the actual IP address for www.microsoft.com.
Note that the only service we’ve set up thus far is HTTP. So, if a client tries to telnet or SSH to microsoft.com, the request will time out and fail. Or, more importantly, if a client tries to visit https://www.microsoft.com, the request will fail. You could configure nginx to host an HTTPS server on the Raspberry Pi; however, because you (probably) can’t spoof certificates for other websites, client web browsers will pop up big security warnings about invalid certificates and try hard to prevent users from proceeding to your Rogue Portal. So, it’s probably not worth the effort to bother with HTTPS (this is also another good reason to prefer HTTPS when you’re surfing the web).
We only want the DHCP serving and DNS hijacking to happen on the wlan0 interface. If we have a wired network connection to the Raspberry Pi that we use for development, we want to actually be able to resolve domain names to their real IP addresses so that we can effectively reach the internet even when the Rogue Portal is active. Therefore, we use that first line to tell dnsmasq to listen only on the wlan0 interface’s IP address of 10.1.1.1.
Finally, note this line:
dhcp-option=114,http://go.rogueportal/index.html
This takes advantage of the relatively new standard RFC 8910 that allows a device to more directly discover a captive portal by sending the portal’s URI via DHCP as opposed to relying on redirects from the portal. The standard does not have wide adoption yet, but I’ve included support for it because it will make the captive portal content load faster on devices that do implement it. Apple supports this feature as of iOS 14 and MacOS Big Sur.
Tell dnsmasq startup script not to use the loopback interface
Open the dnsmasq defaults file with this command:
sudo nano /etc/default/dnsmasq
Add the following lines to the end of the file:
# Do not run dnsmasq on the loopback interface
DNSMASQ_EXCEPT=lo
The dhcpcd service will write the proper DNS servers to /etc/resolv.conf based upon your network configuration. However, when dnsmasq is configured to listen on the loopback interface, it will overwrite the contents of this file and all DNS requests on all interfaces will be hijacked. This seems to be a poorly-thought-out feature of the dnsmasq startup script because it ignores the fact that we’ve configured dnsmasq to listen only on the wlan0 interface.
Therefore, we need to take the somewhat redundant step of explicitly telling the startup script we’re not listening on the loopback interface, which is what the above modification accomplishes.
Enable dnsmasq
Use this command to open the /etc/default/dnsmasq configuration file:
sudo nano /etc/default/dnsmasq
Look for this line (note: it might already be set to ENABLED=1):
ENABLED=0
Replace it with this:
ENABLED=1
Save and exit (Ctrl-X, y, Enter). Then run this command:
sudo systemctl enable dnsmasq
This ensures that the dnsmasq service is enabled.
Reboot and Test
Reboot the Raspberry Pi with this command
sudo reboot
Once the Raspberry Pi boots, you should be able to see and connect to the unsecured WiFi access point with the name you selected. Shortly after connecting, your device should prompt you with a captive portal connection dialog that contains the content from your web server. If it does not, something may have gone wrong with your Raspberry Pi OS configuration or your device’s captive portal detection. To begin diagnosing the problem, you can try navigating a web browser to an http:// url such as http://example.com while connected to the access point. If the web server, routing, etc. is configured correctly on the Raspberry Pi, you should see your content. If not, or if you’re not even able to see or connect to the WiFi access point, then go back and double-check your configuration. If everything looks correct, it’s possible you’re using a newer version of Raspberry Pi OS than I’ve tested and the OS has changed such that my patches no longer work. I’m open to pull requests if you want to try to figure out how to update it. : )
Have fun!